
Using Gmail Labels to get your Email organized
Is your inbox a mess?
Important emails buried under a pile of newsletters, receipts, and things you meant to reply to three days ago? You’re not alone.
Most people don’t realize how powerful Gmail’s labeling system really is — and how easy it can be to use it to stay on top of everything.
In this guide, we’ll walk through how to use Gmail Labels to organize your inbox in a simple, effective way. Plus, we’ll show you how Actor AI Assistant can help automate the process so you don’t have to do it all manually.
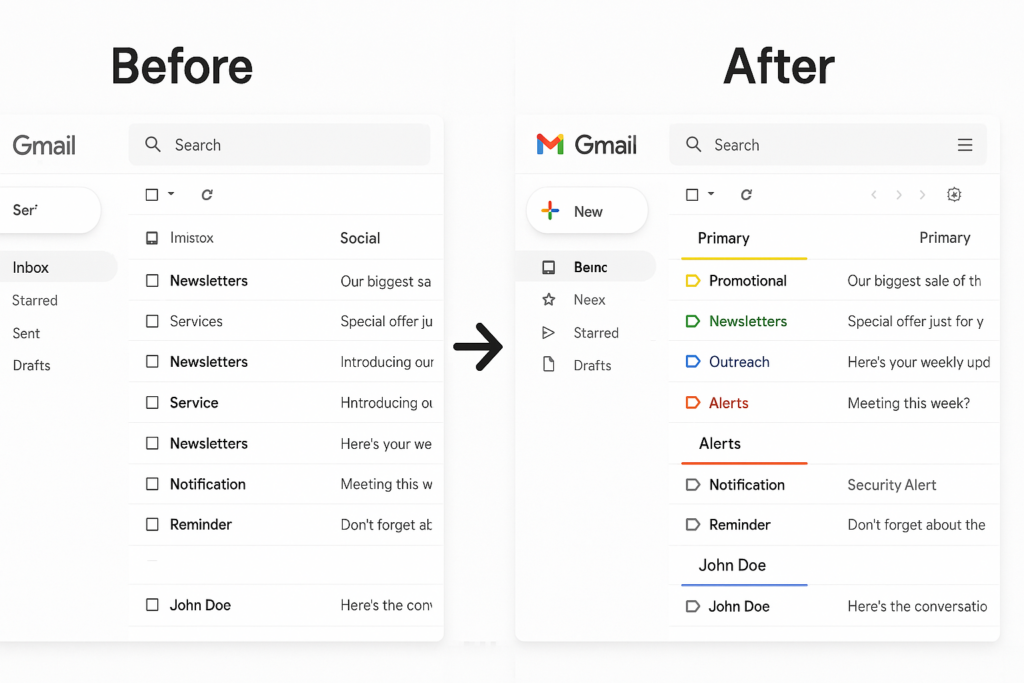
What Are Gmail Labels?
Gmail Labels are a way to tag your emails so you can find and manage them easily later. They’re not folders. That’s actually a good thing.
In Gmail, a single email can have multiple labels, unlike folders where you can only put something in one place. This makes labels much more flexible.
Let’s say you get an invoice from a client about a website project. You can label it as:
- “Invoices”
- “Client: John Smith”
- “Project: Website Redesign”
Later, you can search by any of those labels to find what you need, fast.
When/If you don’t need them any more, you can just remove the label and create a new one.
Why Labels Help
Labels help you:
- Group emails by action or topic
- Prioritize your inbox
- Avoid missing follow-ups
- Search more efficiently
They also let you take control of your inbox without needing to constantly delete or archive things right away.
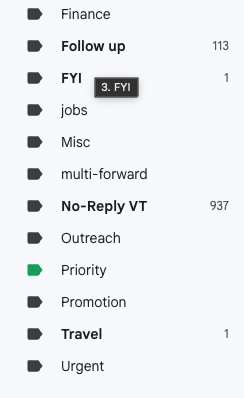
The Best Labels to Start With
You don’t need a hundred labels to stay organized. Just a few well-chosen ones will go a long way. Here are some good starting points:
Action-Based Labels
These are for emails that still need something from you.
- To Do – for anything you need to act on soon.
- Waiting for Response – when you’re waiting on someone else.
- To Read Later – for newsletters, articles, or resources you want to check out but not right now.
Project or Client-Based Labels
If you work on multiple projects or with different clients, labels like these help group conversations.
- Client: John Smith
- Project: Marketing Campaign
You can also nest these for clarity. For example:Client > John Smith or Project > Q2 Launch
Topic-Based Labels
These work for common email types.
- Invoices
- Receipts
- Documents
- Bookings
- Events
These labels make it easy to find important info without digging through your inbox.
Time-Based Labels (Optional)
Some people like labels like:
- This Week
- Archived 2024
These help if you do weekly reviews or want to clean things up regularly.
Make Labels Work Automatically
The real magic happens when you combine labels with filters.
Let’s say you always get receipts from the same email address. You can create a filter in Gmail that:
- Detects any email from
receipts@company.com - Automatically adds the label “Receipts”
- Skips the inbox if you want
You can do the same for newsletters, project updates, or anything else that comes in regularly.
How Actor AI Assistant Can Help
Setting up labels manually works, but it takes effort. This is where Actor AI Assistant comes in.
Actor connects to your Gmail and helps you:
- Automatically label emails based on content
- Extract actions from emails and add them to your Todo List
- Suggest which emails need follow-up and reminds you about those.
- Remind you about emails that were labeled “Waiting for Response” but haven’t gotten a reply
- Summarize emails and give you the next step (and even let you act on it)
For example, you can ask:
“What emails do I need to follow up on this week?”
Or:
“Remind me in two days if I haven’t replied to anything labeled <To Do>”
Actor takes care of labeling, tracking, and even prompting you — so your inbox doesn’t become a black hole again.
Step-by-Step: How to Set Up Gmail Labels
Here’s how to set up your first labels and filters.
1. Create a Label
- Go to Gmail
- In the left menu, scroll down and click “More”
- Click “Create new label”
- Give it a name (e.g. “To Do”)
- Optionally nest it under another label
2. Apply Labels Manually
- Select one or more emails
- Click the label icon at the top
- Choose the label(s) you want to apply
3. Set Up a Filter
- In Gmail search bar, click the dropdown
- Enter filter criteria (e.g. From:
news@source.com) - Click “Create filter”
- Choose “Apply the label” and select one
- Optionally also archive or skip inbox
Tips for Staying Organized Long-Term
- Don’t create too many labels. Stick to 10–15 active ones.
- Color-code your most important labels so they stand out.
- Use search with labels:
label:To-Doorlabel:Client-John-Smith - Review your labels monthly and clean out what you no longer need.
- Let Actor handle repetitive sorting and follow-up tracking.
Final Thoughts
Gmail labels are a simple but powerful way to organize your inbox. With just a bit of setup, you can bring order to the chaos and never miss an important email again.
And if you want a smarter, faster way to stay on top of it all, Actor AI Assistant can help automate your labeling, follow-ups, and reminders — so you spend less time in your inbox and more time doing what matters.
And you know what? Actor AI Assistant is focused on help you organize and do tasks for you.
Ready to try it?
Start organizing your email today and let ActorDO give you back control of your day.